| |
| |
 |
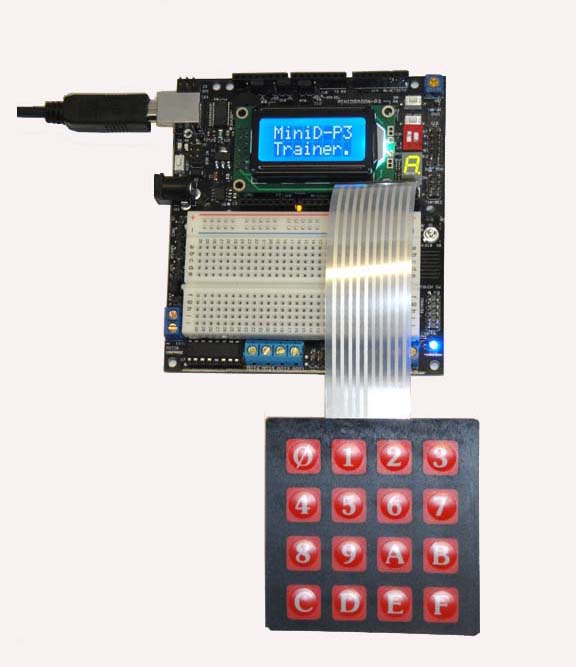
MiniDragon-Plus3 Trainer
A popular upgrade for 68HC11 and
68HC12 boards
|
|
The new MiniDragon-P3
board will replace our MiniDragon+USB and
MiniDragon-Plus2 boards which have been discontinued. All
programs were written for the old boards can run on the
new P3 board without modifications or with a few minor
register address changes.
Following are the
changes over the MiniDragon+USB board:
1. Added on-board USB interface
2. Added automatic sensing/switching circuit to select
power input from USB or external AC
3. Added a temperature sensor for analog input PAD05
4. Added a capacitive touching switch
5. Added dual H-Bridges for controlling two DC motors or one stepper motor
6. Added 4 servo motor controllers
7. Added an on-board 3.3V regulator
8. Four 14x2 female headers are replaced by Arduino shields compatible headers
9. The 7-segmnet LED is common anode on the P3 board, but it was
common cathode on the MiniDragon+USB board
10. Speaker is driven by PT5 or PP7 on the P3 board, but it was driven by PT5 or
PP5 on the MiniDragon+USB board
11. LCD is driven by port K on the P3 board, but it was driver by port M on the MiniDragon+USB board
12. RGB is enabled by PE3 on the P3 board, PE3 must be high in order to enable
the RGB. In order to turn on the RGB,
PE3 must be high and at least one of PP4-PP6
is high. IF PE3=0 or PE3 is programmed as an input, the RGB is off
regardless of the states of PP4-PP6.
Following are the changes
over the
MiniDragon-Plus2 board:
1. Added on-board USB interface
2. Added automatic sensing/switching circuit to select
power input from USB or AC adapter
3. Added a light sensor for analog input PAD02 while the temperature
sensor is moved from PAD02 to PAD05
4. Added an RGB LED
5. Added a capacitive touching switch
6. Added an on-board 3.3V regulator
7. Four 14x2 female headers are replaced by Arduino shields compatible headers
8. Speaker is driven by PT5 or PP7 on the P3 board, but it was
driven by PT5 or PP5 on the MiniDragon-Plus2 board
9. CAN interface IC is not installed
Applications:
- Complete stand-alone HCS12 trainer board for
classrooms
- Perfect for upgrading all outdated 68HC11
development boards
- Robot controller
- A versatile project board with Arduino
shields for senior design projects
- Possible replacement of the legendary Handyboard designed by MIT's Fred Martin
- Possible replacement of the legendary Botboard, Botboardplus designed by Marvin
Green, Kevin Ross and Karl Lunt
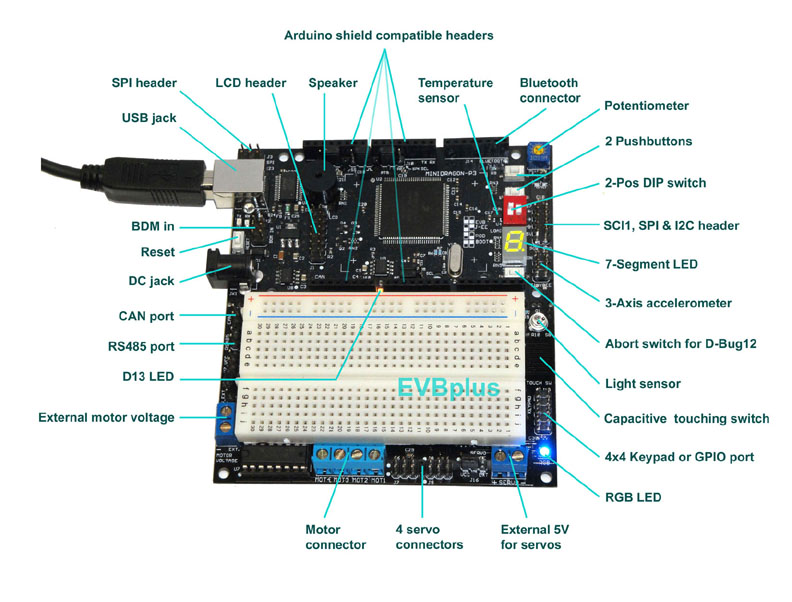
MiniDragon-Plus3 features:
- On-board USB interface based on the flawless FT232RL
for programming and debugging code, no BDM needed.
- Backward compatible to 68HC11 code.
- Automatic
sensing/switching circuit to select power input from USB or AC
adapter
- Fuse protection for USB host
- USB TX and RX indicator LEDs
- Arduino shield compatible headers
- 43 I/O pins
including analog inputs and PWM outputs
- Bluetooth connector
- RGB color LED
- Light sensor
- Temperature sensor
- Dual H-Bridge for controlling two DC motors
or one stepper motor
- 4 servo motor controllers with selectable
supply voltage for servos
- Fits on the Parallax's Boe-Bot chassis
- LCD header for an external character LCD
module up to 40x4
- 4 x 4 keypad header
- SPI and I2C headers
- X-Y-Z accelerometer module interface header
- 7-segment LED display and LED power
indicator
- Capacitive touching switch
- 2-position DIP switch for selecting one of 4 operating modes
with D-Bug12
monitor or RUN/LOAD mode with Serial Monitor
- Auto-start user application program from on-chip
flash memory
- 2 user pushbutton switches
- On-board speaker driven by timer or PWM
for alarm, voice and music applications
- On-board potentiometer trimmer pot for
analog input
- Program abort buttons stopping program when
program is hung in a dead loop
- SCI1 and I2C headers for user's applications
- MC9S12DG256 MCU, 256K flash, 12K RAM and 4K EEPROM
- Dual UARTs, I2C, SPI and ADC
- 16 MHz crystal, 8 MHz default bus speed and up to 25MHz bus speed
via PLL
- Pre-installed with D-Bug12 monitor ( for AsmIDE ) or Serial
Monitor ( for CodeWarrior )
- LED operating mode indication (E,J,P,B) on the 7-segment display
during power-up, no need to remember jumper settings
- Diagnostic code on the 7-segment LED during power up to
aid troubleshooting
- On-board BDM-in connector to be connected with a BDM from
multiple venders, including our USBDM, for advanced debugging
- Supports C and Assembly language source level
debugging using Code Warrior
- Support any C compilers and Debuggers, including Imagecraft ICC and NoICE
debugger
- Four operating modes: EVB, Jump-to-EEPROM, POD and Boot loader
- Many fully debugged 68HC12 sample programs
including source code
- Includes a test program that reads
pushbutton and capacitive touching switch to show their
functions on the 7-segment LED display while playing a song, it shows a number
being counting-up or counting-down, counting fast or counting slow on the
7-segment LED display, and also allows to change 7-segment LED
brightness by adjusting the trimmer pot at the same time
- Small PC board size 4" X 4.475"
Optional Features:
- Plug-in 8x2 LCD module with backlight
- 4x4 membrane keypad or pushbutton keypad
- CAN interface
- RS485 interface
- X-Y-Z accelerometer module for Mechatronic
applications
The price of the MiniDragon-Plus3
kit for students and
schools is $129.00.
The price includes the MiniDragon-Plus3 board, a solderless breadboard
and a
6 foot USB cable.
For US and Canadian orders we will also include a 9V 500mA switching power supply AC
adapter at no extra cost.
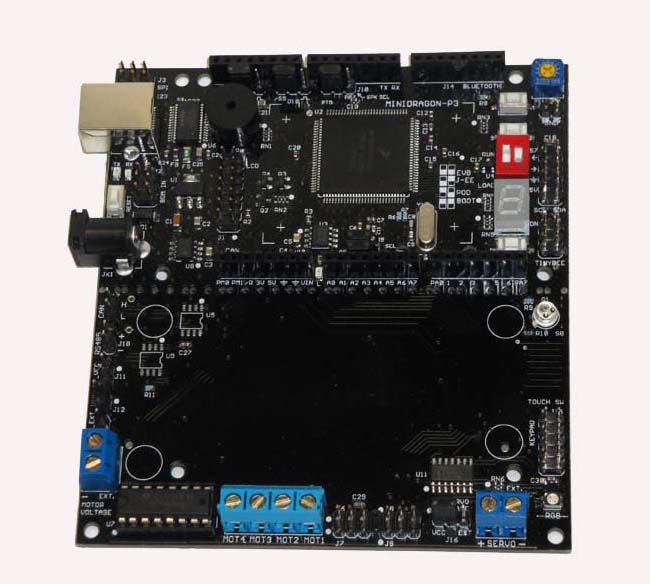
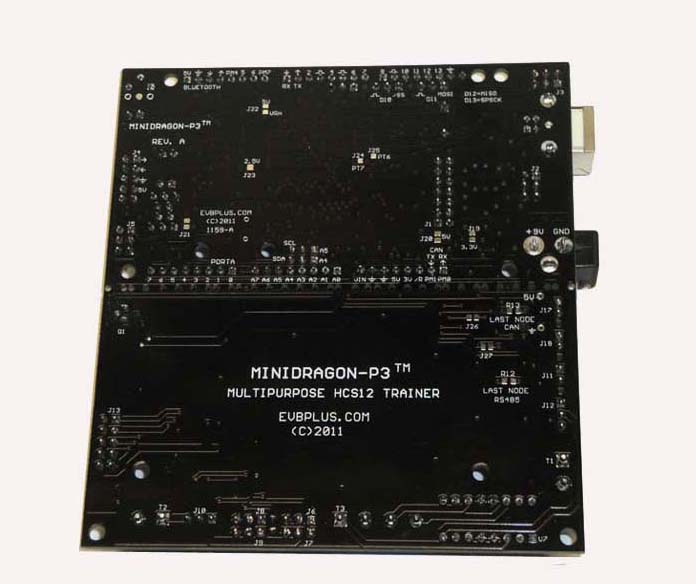
MiniDragon-Plus3
silkscreen
The
MiniDragon-Plus3 board comes with a
built-in USB interface based on the FT232RL. The driver for the FT232RL must be
installed properly before using the P3 board.
Install and verify USB driver:
-
Before connecting the
Plus3 board to your PC's USB port for the first time, make
sure that the AC adapter is unplugged. You do not need to turn on the board to
install USB driver.
-
Go to the FT232RL driver
installation and verification page for operating procedures:
http://www.evbplus.com/TinyUSB_9s12/ft232rl.html.
-
Once you have verified that the USB
driver is properly installed, you may
invoke the IDE (CodeWarrior or AsmIDE).
-
If you
are going to use CodeWarrior IDE and have not installed it you need to
Download and configure CodeWarrior
http://www.evbplus.com/Code_Warrior_hcs12.html
In order to establish a reliable USB
communication, always connect the Plus3 board to your PC's USB port first
before invoking the IDE (CodeWarrior or AsmIDE), otherwise the IDE will not be able to
communicate with the Plus3. During a debugging session, if you
accidentally unplug the USB cable from the Plus3, you need to re-cycle the
USB communication. The IDE will not recognize the Plus3 again
if you just simply plug back in the USB cable.
To
re-cycle the USB communication you need to
exit the IDE and disconnect the USB cable from the Plus3 board, wait
for a few seconds before re-plugging in the USB cable,
then wait for a few more seconds and allow the USB communication to be
re-established with the Plus3. After re-establishing the USB communication you can invoke
the IDE again and the IDE will start to communicate with the
Plus3 board. If this does not work, you need to restart
your PC.
If
restarting the PC does not solve the problem, you may need to re-install
the USB driver.
| |
 |
 |
|
| |
Component side view |
Solder side view |
|
| |
 |
|
|
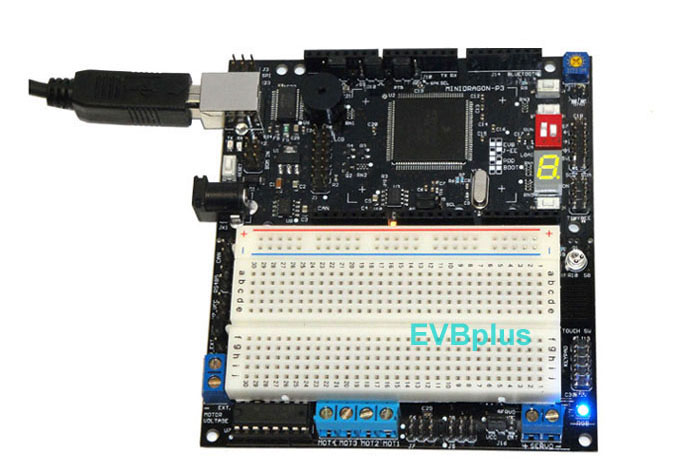
| |
With an 8x2 LCD and a 4x4 membrane keypad
|
|
|

The above picture shows how an
8x2 LCD, a UTB module, a 3-axis TinyBee accelerometer, a 4x4 pushbutton keypad,
two servo
motors and two DC motors
are connected to the MiniDragon-P3. Although in the picture there are only two
servo motors connected to the P3, but the P3 can control up to four servo motors.
The feature packed MiniDragon-P3 supports Arduino
Shields, and together with a solderless breadboard, it's a
complete training platform for learning HCS12 programming in university
classrooms. Learning embedded programming with a proven hardware platform
will save you time especially in a short semester. What matters most is how much
your students can learn in a short period of time. Sometimes instead
of learning embedded programming students would spend most of their time ordering parts
and troubleshooting
their hardware. By the time they've corrected their circuits, half of semester
will have passed by. That won't happen with the MiniDagon-P3 trainer.
After a course is over, the P3 board can be used as
a robot controller. It fits the Parallax's Boe-Bot chassis and can control two
DC motors and 4 servos. It also can be used in many senior design
projects. Thanks for the Arduino evolution, students can make many senior design
projects by purchasing low cost application-specific shields to work with the
MiniDragon-P3.
|
|
|